Showing posts with label fast. Show all posts

Monday, November 19, 2012

A State of Mind...

Hello to you all!  Can you believe that Thanksgiving is on Thursday?  I can't.  This year has absolutely flown by.  One thing I am super excited about...our daughter is going to be home from college tomorrow!  Woohoo!  I can't wait to see her.  We have a couple of projects lined up for when she gets home.  One of the ones I can't get out of my mind is making some things out of our State Towels and Tablecloths.  I have said previously that I want to make a set of pillows for our couch that have meaning to our family.  Here are the ones that I want to use...
We live in Oklahoma.  

We took the kids to Colorado for Christmas one year for a 3 day vacation.  Those 3 days turned in to a whole week due to 2 blizzards coming in at the same time we were there.

I am from TEXAS...enough said!...LOL

I also want to try whipping up some quilts using some of the State Tablecloths.  When we were in Houston for the Quilt Festival, I heard the idea of making quilts out of tablecloths.  Well, I don't know about you, but I thought this was brilliant.  Here are the ones that I have in mind for whipping up as quilts...
*Mom and Dad, stop reading this post right now...what follows is a Christmas spoiler!
My Dad is from Florida.  I can see a lot of quilting to make this little beauty pop as a quilt top.

My Mom is from Washington.  Again, the quilting you choose to do with this would just enhance this.

I am not sure how you may view all of our State tablecloths and towels.  Each one I see brings up memories for me.  What I would like to know is how would you use them?  Do they conger up memories for you or do you see really cool towels to represent your states?  How would you use these in your home?  I would love to hear your ideas or maybe suggestions for tutorials you might like to see.

Head over to our website and check out all of our State items.  Let me know which would be the first one you would purchase.  Remember, when you check out use my Discount Code.  

Have a FANTASTIC day, and a BLESSED Thanksgiving!

Monday, August 20, 2012

A Honey Bun Pillowcase!

Good Monday Morning!  For the next 3 days we are offering 10% off of all of our fabrics.  I wanted to show you a pillowcase tutorial that you could quickly make up with some of the great fabrics that I know you will want to get.

Supplies
1 honey bun--I used Bungle Jungle
1.5 yds of main fabric--I used Christmas Red Dottie
Ric Rac--I used Medium Aqua
.5 yd of lightweight interfacing
Have you ever noticed that when I am using a honey bun or jelly roll that my pictures never have them rolled up?  It is because I can't wait to open them up and see what is inside.  It is the little kid in me...it is like Christmas every time I get a new one...just can't wait.

Choose 22 strips.  Lay them out and get the look you are going for.

Sew your strips together.  The easiest way to do this is sew 2 together at a time.  Then add them all together to form one piece.

Cut 2 strips that are 11" wide x the width of the fabric that you have sewn together.

Now, sew the 2 strips together end to end.

Add your interfacing to the wrong side of the strips.  The only reason I did this, is so when the pillow case is washed, the seams won't get all bunched up and weird.  You can completely skip this step if you like.

Cut your main body of fabric to 21" x width of fabric.

I folded my sewn together strips of fabric in half and laid them down on the main body of the fabric, then trimmed the main body to the same size as the strips.  It is hard to give an exact measurement here because of how your strips come together.  Just make that both are the same size and you shouldn't have any problems.

Choose another Honey Bun strip.  Press it in half along the entire length of the strip.

Sew a piece of the ric rac along the entire length of the strip.  I placed mine really close to the edge of the fold so when I sewed the case together you could see all of the ric rac.

Layer your 3 pieces together.  Make sure your fabrics are all unfolded.  Place all right sides of the fabric facing up.  You want to start with the stripped fabric...then the main body...then the strip that has the ric rac.

Line up all your edges. 

 I place 3 pins along the edge just to hold everything together.  Trust me it is a pain to sew it all together and the realize that you have missed places because the fabric has shifted.

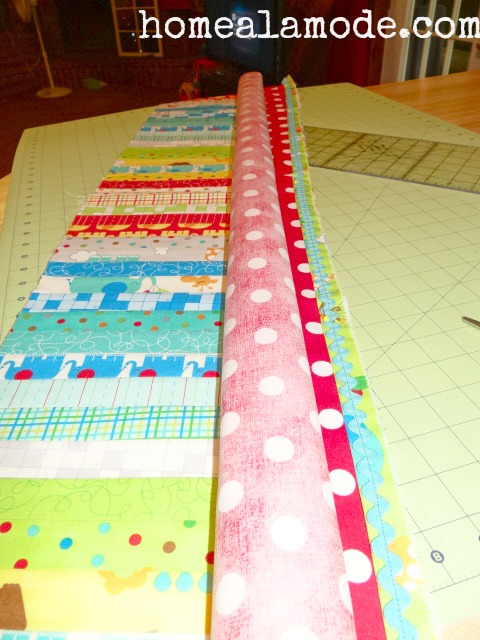
Roll up your main piece of fabric.

Now, fold up your stripped fabric and pin the edges together.  You want to make sure that the main fabric is not in the way.  When you roll it up leave yourself about 2 inches of room so you can pin the edges together. 
*On a side note.  See that really awesome pincushion?  That is a Grabbit Magnetic Pin Cushion.  If you don't have one...GET ONE.  I love how powerful the magnet is on this.  With a little one around, I don't have to worry about my pins falling off and her finding them with her little foot.

Sew along your edge using a 1/4" seam.

Grab your main fabric and start pulling it out of the end of the tube you just made. Don't forget the pins that you put in to secure your layers.  I did...it hurt...learn from my mistakes...lol.
  
Keep pulling until you have turned the entire tube inside out.

This is what you should have.

Press your pillowcase with wrong sides together.

Using a scant 1/4" seam sew along the 2 open edges.  Once you have done this, turn your case inside out.  Press again.

Now you want to sew down the edges that you had sewn in the previous step. Use a 1/2" seam.  This gives you a French seam and you have no open seams on your pillowcase.  Turn it right side out again and press.  WooHoo!  You just made a pillowcase.
  
Here it is completed.  Now, my question for you, would you like to see a tutorial of how I made the adorable little pillow in front?

I had told you on Friday that I would show you all of the things that I was able to make with the honey bun.  Here they are...
So, what do you think?  Personally, the little bag with the flower is my favorite!  I think I will have to make ups some more of that one.

Now, head over to Home a la mode...check out all of our fabrics...and get to sewing.  Remember, if you use my Discount Code it will give you an extra 5% off your order.  That means you can get 15% off of your fabric.  That sounds like a pretty good deal to me!


Tuesday, August 14, 2012

Our Say It With Words Winner!

Good Morning!!!!  Ok, you guys always amaze me!  Thank you so much for all of the kind comments on the What Cancer Cannot Do Tutorial.  I sat reading them all to my husband last night.  I really do enjoy hearing from everyone!

Now on to some pictures of my finished quilt.


Here is a pic of the quilting I did on the header...

One More....

Now our Winner!!!!


Congrats, Shannon! 
Contact Karen at ksmisek@homealamode.com and give her your choice and shipping information.  


Monday, August 13, 2012

Quilt Tutorial and Giveaway!!!

Good Morning everyone!  I hope you have had a great weekend.  We had some crazy storms come through last night.   Thankfully, everyone is OK.  

I want to share a tutorial today using a jelly roll and one of my favorite Say It With Words Panels.  This is the second quilt that I have made with the What Cancer Cannot Do Panel.  I love these.  While I was making this one, my Mom called to ask me to pray for a couple of her friends that had just been diagnosed with cancer.  I told her what I was doing and said that maybe she should make one for her friends.  I think these are so inspirational!  Now on to the tutorial...

Supplies

1--Jelly Roll--I used Salt Air
1.5 yds of Kyoto Batting
1.5 yds of Backing Fabric--I used Salt Air Tiny Bubbles--Mist

Start by cutting your panel.  

Open up your jelly roll and select 12 strips.  I like to lay them out and try different combinations.  This is the final layout I decided on.

Line your first jelly roll strip up with the short edge of the first saying that you want to sew...use a 1/4" seam and sew down the edge.

Repeat for the other side.

Press your seams towards the jelly roll strip.

Trim the strip.

Here is what it should look like.

Next, sew the jelly roll strip to the top and bottom of the saying.  Trim the edges so that it is all even.

You have completed your first block.

Repeat the steps for the remaining 11 saying blocks.

Now, you want to lay out strips to make columns and rows.

Take the first strip that runs vertical and sew your blocks to it.  Leave some space between the blocks as you sew them...
When you have sewn them all... cut the jelly strip apart lining up all your edges.  This will create your first "column" on your block.

Repeat for your 2nd "column".


Repeat again for your 3rd "column".

Again, repeat for your 4th "column".  Can you see it starting to come together now?

Start assembling your rows now.  Line your first jelly roll strip with the top edge of the first row. Sew and press your seam.

Add your 2nd strip between the first and second row

Repeat these steps until you have added all your strips between each row and after the 4th row.  Trim up your edges.

Now, it is time to create the header for the quilt.  Add another jelly strip to the top of your quilt top.  

Take the part of the panel that has the title.  Cut a jelly roll strip in half and sew it to both side of the words.

Sew this strip to the strip that you just added to your quilt top.  Add another strip to the top of the title piece.    Trim all of your edges so they are squared up.

You have now completed the quilt top.  I love showing pictures of the quilt tops with the sun shining through them.  They remind me of stained glass.

Now it is time to make your quilt.  Layer your backing fabric first, then your batting, then your quilt top.  I like to trim my batting an inch to 2 inches bigger than my quilt top...and then my backing fabric a couple of inches bigger than that.  Trust me, there is nothing more frustrating than being in the middle of quilting and realizing your layers have shifted and they don't fit together anymore.
I have a confession...I HATE TO PIN QUILTS!  There, now that it is out there for the whole world to see...hehe...I will share my secret weapon.  Quilt Basting Spray!  This stuff is soo awesome.  Just spray it between layers...smooth them together and voila...you have "pinned" your quilt.

I spray my quilt one half at a time.  Always remember to only apply the spray to your batting.  I fold my quilt top and batting back so that I can spray the batting.  Then lay the batting back down on the backing fabric...smooth it...

Spray the top of the batting...then smooth the quilt top down on top of that.  Repeat these steps for the other half of your quilt.

Now, using your quilting foot...quilt your layers together.


When your have finished all of your quilting...run a zigzag stitch around the outer edge of quilt top.  This will bind all of your layers together and make it 10 times easier to add your binding.  Make a binding using scraps and leftover jelly roll strips.

I will be back tomorrow to show you my completed quilt.

Now...on to the giveaway...we wanted you to have the chance to win one of our 

To Enter:  Check out the different panels we have and tell us which one you would like to win.  You might also let me know what you think of the tutorial.  I love your feedback!!!

I will announce the winner tomorrow morning!!!  
Good Luck to Everyone!


Related Posts with Thumbnails